|
Step 7 Now go to your foreground color and
click on the black arrow select gradients, then click on the gradient and
when the popup window comes up scroll til you find the fading
spectrum gradient, use these settings.

Step 8 Now go flood fill your white borders.
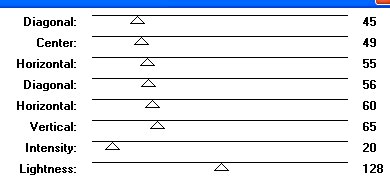
Now go to effects, filters and Greg's pool shadow, apply these settings.
Step 9 Now we need to go to effects, noise,
add. Now add 12% and click ok. Now got to effects, 3d effects, drop shadow
and apply these settings.

Select none now with your magic wand click on the white in
the center and hit selections invert. Now copy and paste as a new image,
and your done with the frame. You can add a drop shadow if you wish at
this point.
Step 10 Now we are going to add our egg tubes
we made. before adding an egg be sure to add a new raster layer so you can
rearrange the eggs how you want them.
Step 11 Now click on your picture tube icon,
go to your tool window and select the egg of choice, change the size to 25
and place it in the left corner. Continue doing that with the different
colored eggs you made. Remember you can rotate any of them to the right or
left. Apply a drop shadow to each and your now done decorating your new
easter egg frame. Now to export either as a tube following the directions
on page one or as a pfr which is frame format.
Step 12 To save in pfr format just click on
file, save as, then select psp, type in your frame name with the .pfr at
the end and save to your psp frame folder. Next time you click on frame in
psp your frame should be there.
 Back Back
Return
to Tutorial
Archives |